How to Set Up a Mending Basket for Household Clothes
Set up a mending basket that keeps each clothing repair with its matching tools and materials, so you can resume useful work without sorting first.
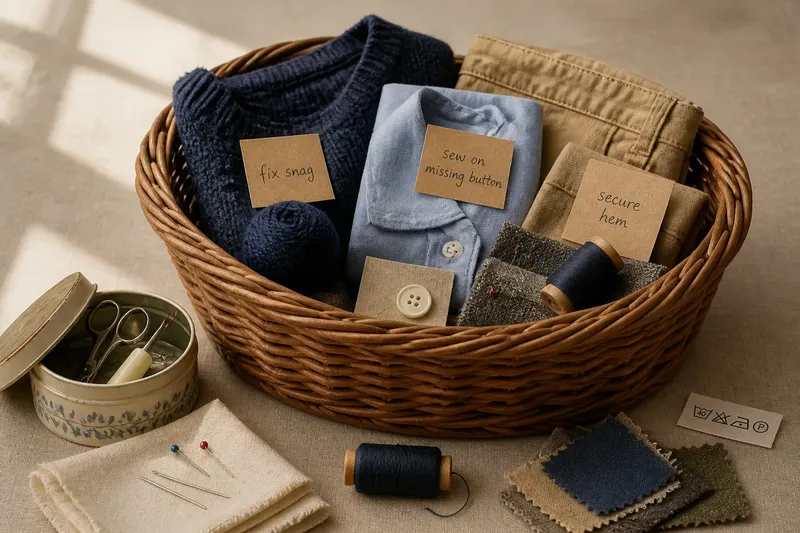
A mending basket works when it keeps each unfinished clothing repair together with the materials it needs. For a mending basket, choose a container around the garments you actually mend, then pair each waiting item with its button, patch or task note.
Match the basket to repairs
Think of the basket as a working place for clothing repairs, not as a general store for sewing supplies. A shirt with a loose button, trousers with a split seam and a jumper with a snag each need different materials; keeping the relevant items with each garment saves you from sorting a mixed pile before you can begin.
Use a shallow basket if you want to see the waiting work, or a handled container if you move between a table and a chair. If needles or small parts could be reached by children or pets, choose a lidded tin or box and put sharp tools away after each session.
Say a shirt’s button has come loose and you find the button in a coat pocket. Put the shirt and button in the basket together, then add a paper slip reading “sew on loose button”. The next time you sit down, the garment, fastener and task are all visible; if the button is missing instead, mark that and set aside a suitable replacement before sewing.
Choose useful materials
Keep a compact set that suits the clothes in your household, and add specialised supplies only when a particular repair needs them. A few well-matched items are easier to use than a crowded assortment that obscures the work.
- Needles: Check whether the repair is on woven cloth or knitwear; use an ordinary sewing needle for woven fabric, and a blunt wool needle when working with yarn. If the fabric is delicate or the needle catches, stop and seek a more suitable tool or professional help.
- Thread or yarn: Compare the repair material with the garment’s colour, weight and stretch; choose matching sewing thread for a woven seam or compatible yarn for knitwear. If you cannot find a comfortable match, postpone the repair rather than forcing a stiff or conspicuous substitute.
- Small fabric scissors: Check that the blades cut thread cleanly and that the tool is kept for cloth. If they snag or crush the material, use sharper fabric scissors rather than pulling at the thread.
- Spare buttons: Check each loose button against the garment’s remaining buttons for size, shape and attachment. If it does not match, keep it with the garment while looking for a better replacement rather than sewing on an obvious mismatch.
- Patch fabric: Check that a scrap has a similar weight and stretch to the damaged area. If it feels stiff against a soft garment, choose a more compatible scrap or ask a repair professional about another method.
- Seam ripper and pins: Check that the seam ripper is needed to remove stitches and that pins can hold the cloth without distorting it. If the fabric is fragile or the repair is hard to reach, stop before unpicking and consider a tailor.
- Care label or maker’s advice: Check the garment’s care instructions before using heat, adhesives or a treatment that could affect its finish. If the instructions warn against the method, choose a compatible sewn repair or ask a qualified textile professional.
Keep each repair together
Make every waiting job specific. A short paper slip such as “secure cuff seam” or “replace missing button” is more useful than a general note to mend the garment, especially when you return to the basket after a pause.
Keep only genuine repair jobs in the basket. If it becomes crowded, finish a small task, move a complex garment into its own project bag, or take the item out of the queue if you would not wear it even after repair.
Imagine you have a jumper with a snag, a shirt missing a button and trousers with a loose hem. First, put each garment on a clean surface and identify the repair: the jumper needs matching yarn, the shirt needs a compatible button, and the trousers need thread close to the hem colour. Next, place the jumper with yarn and a blunt wool needle, the shirt with its replacement button and sewing needle, and the trousers with suitable thread and pins; add a separate task slip to each bundle. If the button does not match or the jumper’s yarn cannot be matched comfortably, leave that job marked for a better material rather than using the wrong one. The result is a queue of separate, ready-to-resume repairs, with uncertain jobs clearly held back.
When is a mending basket useful?
Does a mending basket need to be woven?
No. A tin, fabric pouch or lidded box works if it can hold the garment and its repair materials together. Choose an open basket for visible work, or a closed container when tidiness and keeping small tools contained matter more.
What should stay out of the basket?
Keep unrelated craft supplies and garments you do not intend to repair elsewhere. If a sharp tool or small part could be reached by a child or pet, store it in a closed container and put it away after use.
Can iron-on patches replace sewing?
They can suit some fabrics and small repairs, but heat and adhesive may not suit every garment. Check the care label and the product instructions; if either rules out the method, use a compatible alternative or consult a repair professional.
When should I take a garment to a tailor?
Consider a tailor for delicate, valuable or technically complex clothing, and when a repair affects fit or a hard-to-reach seam. If the fabric is widely worn or you would not wear the garment after repair, decide whether another use for sound fabric is more suitable.
Decide what deserves repair
Before a garment enters the queue, ask whether you would wear it again if the repair were comfortable and sound. A small seam opening may be manageable at home, while widespread thinning or repeated failure may make repair impractical.
If you no longer want the garment, take it out of the repair basket rather than letting it become a permanent obligation. Sound cloth may be useful for patches; pass the garment on only if it remains suitable for someone else. Keep the mending basket focused on clothes you are ready to care for, with each repair’s tools and materials kept alongside it.